Series · Easy Mac Skills for Non-Experts
Episode 1 · Easy Mac Skills for Non-Experts 1: Initial Setup
This MacBook initial setup guide helps Mac for beginners learn a few useful defaults.
Why I kept using a Mac
Ten years ago, I was a dedicated Windows user. After discovering how comfortable Linux-style workflows could be, I moved my main computer to a Mac and gradually became dependent on it for daily work. I currently use a MacBook Pro with an M4 chip, 48GB of memory, and 1TB of storage.
That does not mean a Mac is the right answer for everyone. My own experience has been that system-level freezes and blue screens are rare, older Macs remain useful for basic tasks, and the trackpad is easier to live with than a succession of failing mouse wheels, cables, and sensors. I still use a 2012 MacBook at home for simple work.
People with wrist pain may find a trackpad more comfortable because the wrist can stay relatively still, but persistent pain should be discussed with a professional rather than solved only by changing hardware.
Apple silicon also feels very different from my 2019 Intel MacBook. The Intel machine becomes hot and loud when a workload grows, while current MacBooks are generally quiet and have long battery life for everyday tasks. Treat these as personal observations, not a guarantee for every model or workload.
Think about backup and clean setup separately
When setting up a new Mac, many people ask whether they should restore the old Mac exactly as it was. There is no single answer. The important distinction is between not backing up and not restoring the entire old system image.
Time Machine automatically backs up files, apps, photos, email, and documents to external storage, and it can restore some or all of that data later. Apple recommends backing up before erasing a Mac and suggests using a backup disk with at least twice the Mac’s storage capacity. See Apple’s Time Machine guide for the official setup and restore steps.
My preferred workflow is:
- Back up documents, photos, certificates, and project files that would be painful to lose.
- Set up the new Mac cleanly instead of importing every old setting.
- Reinstall the apps you actually need from a short list.
- Keep the old Mac for a while and confirm that no important files are missing.
This can reduce the amount of old cache and configuration that follows you to a new machine. If your environment is complex and difficult to reproduce, Migration Assistant may be the better choice. Apple says it can transfer documents, apps, user accounts, and settings from another Mac, a PC, or a Time Machine backup. See the official Migration Assistant guide.
Do not erase the original Mac or its backup before checking the new setup. A backup is insurance; a clean install is a way to organize the new machine.
From Spotlight to Terminal
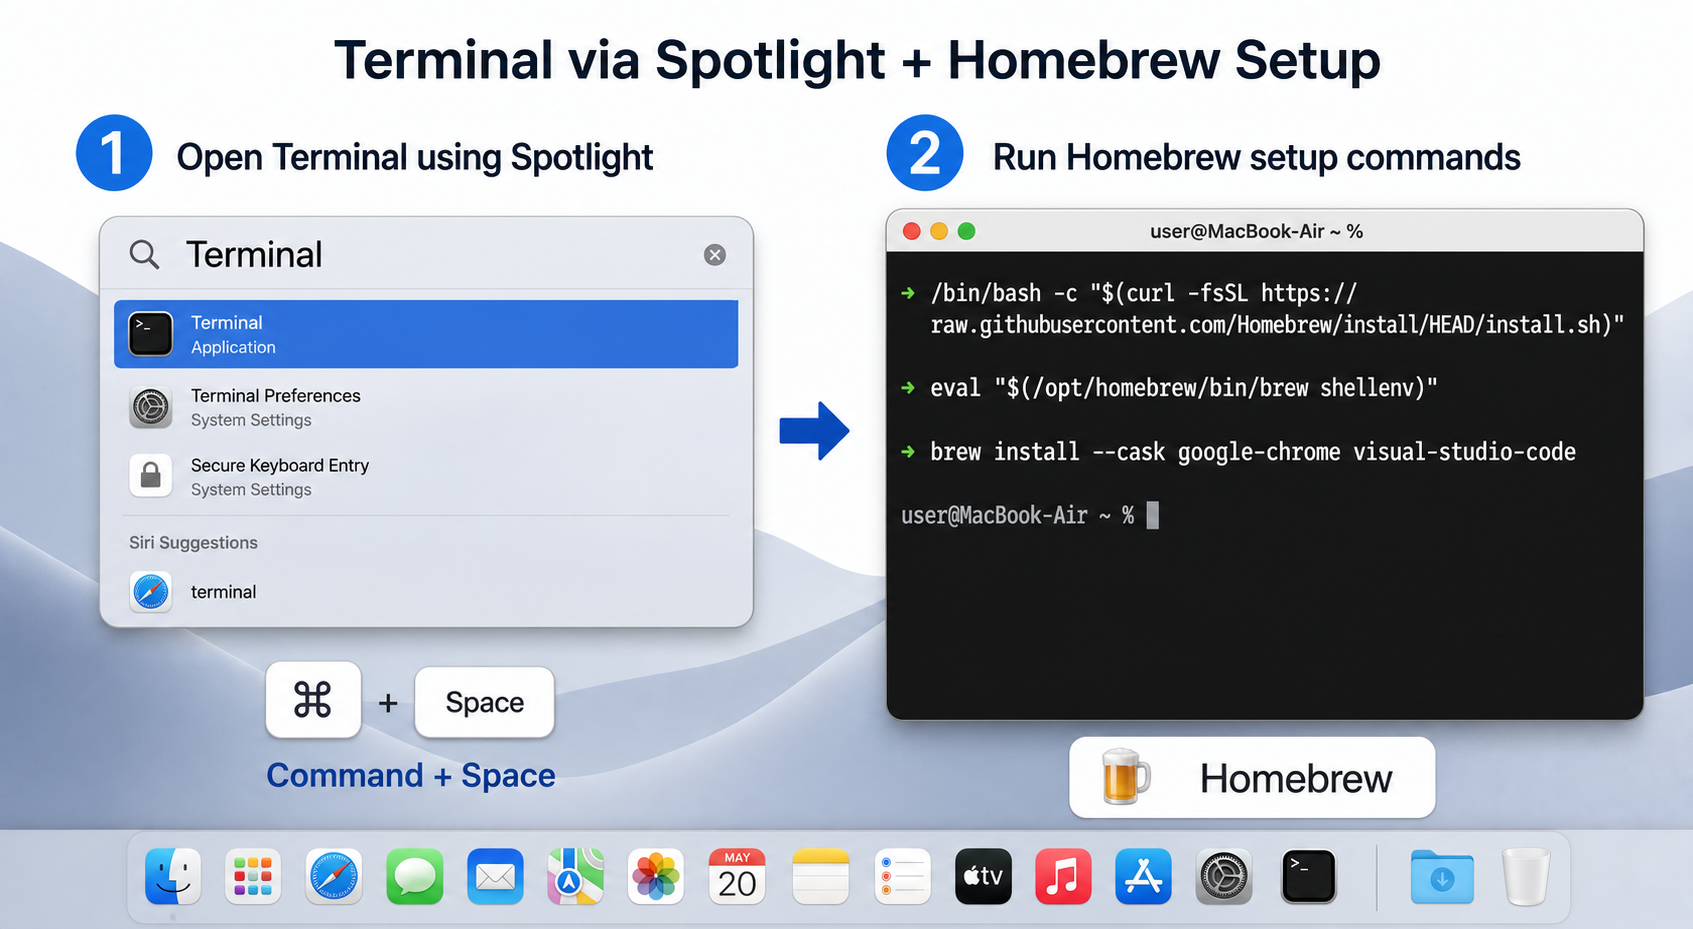
The easiest way to find an app on a Mac is Spotlight. Press Command + Space to open the search field in the middle of the screen. Type Terminal or term, then press Enter.
Terminal is not exactly the same as Windows File Explorer, but it is a text-based space for working with files and programs. If the black window feels intimidating, think of it as a place where you run one clearly understood command at a time.
Install initial apps with Homebrew
For Mac beginners, Homebrew installation is a useful skill when rebuilding a machine. Homebrew is a package manager that lets you install Mac applications and developer tools from the command line. Its official documentation lists /opt/homebrew as the default prefix for Apple silicon Macs and /usr/local for Intel Macs. Check the Homebrew installation documentation before running the command.
Paste this into Terminal:
At the end of the installation, Homebrew prints the command needed to add itself to your shell environment. On an Apple silicon Mac it usually looks like this:
On an Intel Mac, the path may look like this:
This tells the shell where the brew command lives. Prefer the exact instruction printed by the installer instead of blindly registering /opt/homebrew on every Mac.
Once that works, you can install the apps you need. For example:
This is only an example list. Do not install apps you will not use. Search for current cask names with brew search --cask, and add applications one or two at a time. If one app name has changed, the whole command may stop, so isolate the failing app and check it separately.
Asking an AI for a Homebrew command can be useful, but do not paste an unfamiliar command without understanding what it installs or changes. In particular, verify that a curl download comes from the official site before executing it.
Save the app-install commands in an iCloud-synced note if that helps you repeat the process. Never put passwords, recovery codes, API keys, or other secrets in that note or in shell commands. Use each service’s official login screen for authentication.
Trackpad and virtual desktop settings
Now let’s change a few daily settings. Menu names vary slightly by macOS version, but on recent versions you can start at Apple menu > System Settings > Trackpad.
Under Point & Click, enable these options:
Secondary click: chooseClick with Two Fingers, the Mac equivalent of a right-click.Tap to click: turn it on so a light tap registers as a click.
Apple describes secondary click as Control-click on a Mac or right-click on Windows. The official trackpad settings guide also covers two-finger clicking, tap to click, zooming, and other gestures.
For three-finger window dragging, open System Settings > Accessibility > Pointer Control > Trackpad Options and set the dragging style to Three Finger Drag. You can then move a window with three fingers instead of pressing down on the trackpad while dragging.
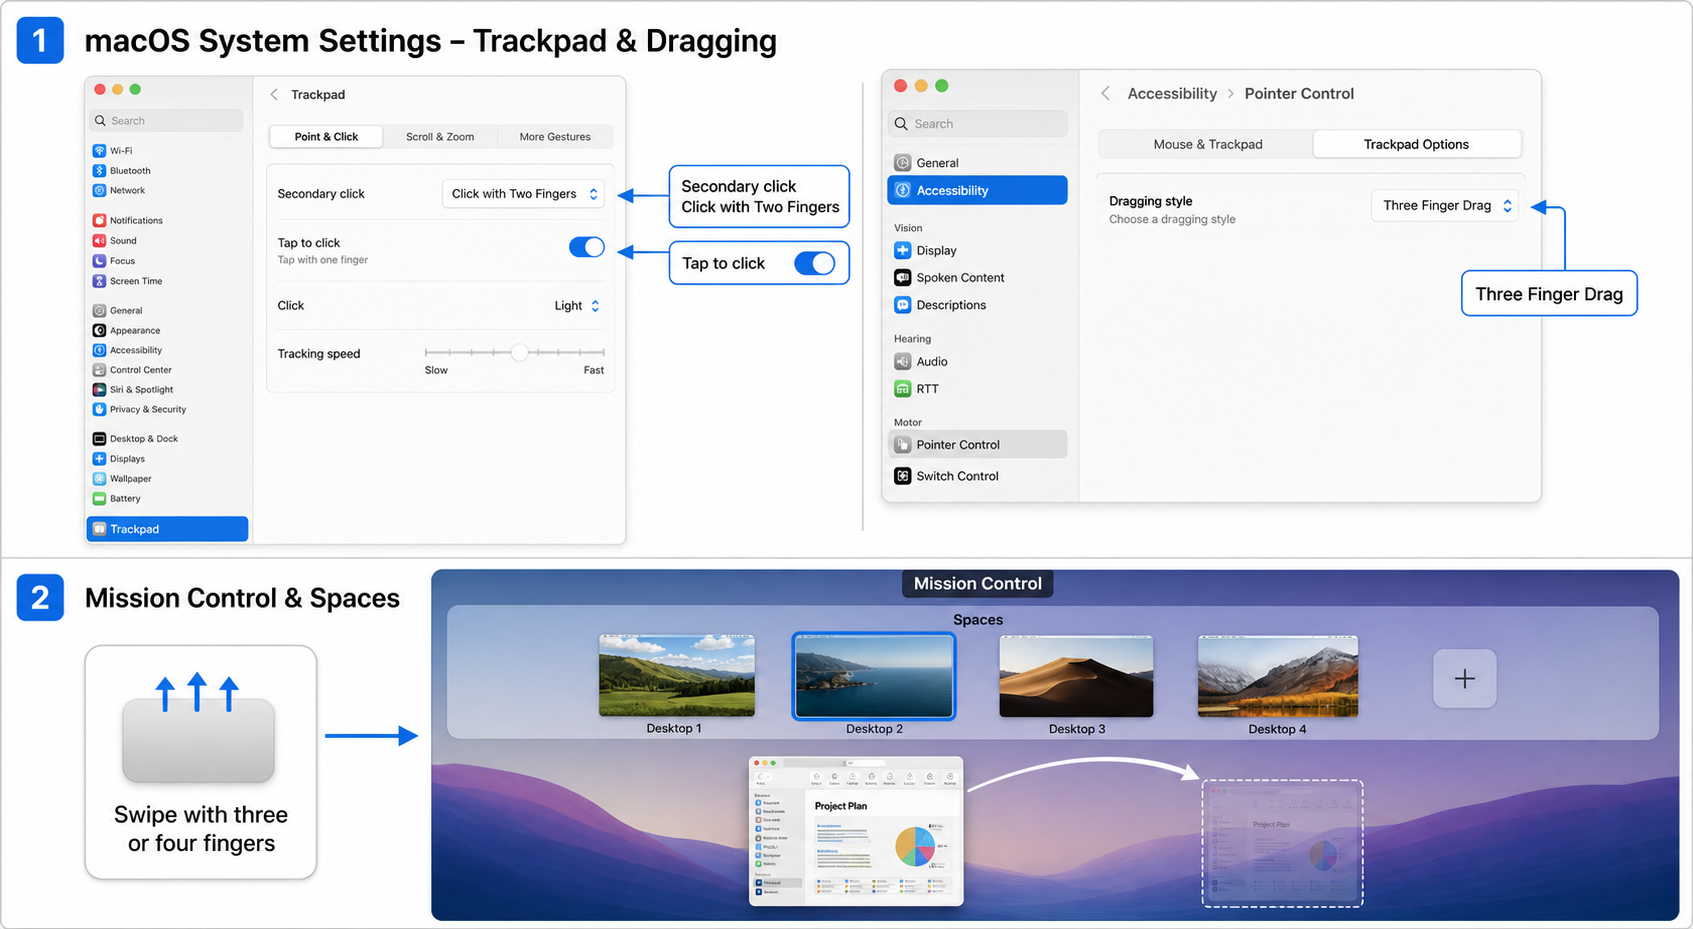
Mission Control displays open windows and virtual desktops together. Swipe up with three fingers, or use the configured Mission Control gesture, to see your windows. Click the + button in the Spaces bar to add a desktop, then swipe left or right with three or four fingers to move between spaces. See Apple’s guides for Mission Control and Spaces and working with multiple Spaces.
Start with only a few spaces, such as Work, Personal, and Meetings. Move windows into the right space and learn the gesture gradually. Spreading your thumb and three fingers can reveal the desktop, which is useful when you need to find a file quickly.
You can also clean up the Dock. Drag an app icon out of the Dock to remove the shortcut; this does not uninstall the app. Keep only the apps you open frequently.
The main lessons from Part 1 are simple. First, do not confuse backup with a clean setup. Second, use Command + Space to become comfortable with Spotlight, Terminal, and Homebrew. Third, enable secondary click, tap to click, three-finger drag, and Mission Control one setting at a time.
Part 2 will cover Finder, file extensions, screenshots, archives, and app removal—the everyday Mac tasks that new users encounter most often.


