Series · Easy Mac Skills for Non-Experts
Episode 2 · Easy Mac Skills for Non-Experts 2: Finder
This series helps people who are new to the Mac learn setup, settings, and everyday workflows step by step. Part 1 covered initial MacBook setup, the trackpad, and Mission Control. In Part 2, we will look at Finder, the app you will use every day when working with files on a Mac.
This guide is for anyone looking for a Mac Finder guide or trying to understand Mac file management for the first time. We will start with the basic Finder structure and settings, then move through the features that are most useful for Mac beginners.
The menu locations and folder roles in this article follow Apple's official guidance. Opinions about which settings feel most convenient are based on my own experience.
Finder is the Mac's file explorer
When you turn on a Mac and need to find a file, Finder is usually the first app you will use. Finder is the built-in file manager for viewing and organizing documents, photos, downloaded files, installed apps, external disks, and almost everything else on the Mac. It is easy to begin by thinking of Finder as the Mac equivalent of Windows File Explorer.
There is one important interface difference. Mac apps do not place their main menu inside the top edge of each window. The menu for the currently active app appears in the menu bar at the very top of the screen. Even when a Finder window is open, look at the top of the screen—not just the area above the window—to find its commands.
Finder is one of the parts of macOS that feels more natural to me than Windows. Opening folders, checking the current location, and grouping related work into tabs fit my daily workflow well. That is a personal usability preference formed through experience, not an objective claim that one operating system is better for everyone.
Click the blue, smiling Finder icon in the Dock to open a Finder window. Apple describes Finder as the main place to organize and access documents and folders on a Mac. You can also review Apple's official overview of Finder's role and interface.
Set up a few Finder defaults first
You do not need to change every available setting at once. I start by enabling the items that make it easier to identify a file's location and current state, then keep only the sidebar items and tags that I actually use.
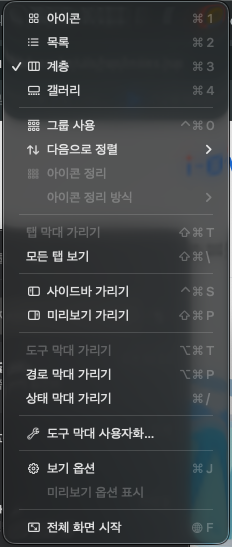
Show three bars from the View menu
Activate a Finder window and open View from the menu bar at the top of the screen. Turn on these three items:
Show ToolbarShow Path BarShow Status Bar
The toolbar contains controls such as back, view selection, and sharing. The path bar shows which parent folders contain the current folder. The status bar shows information such as the number of items and available storage. As described in Apple's official Finder toolbar guide, you can also add, remove, and rearrange toolbar buttons.
Keeping all three bars visible makes it easier to check where you are, what is in the current folder, and which actions are available. If the window feels too crowded on a small display, you can simplify the toolbar later.
Organize General, Sidebar, and Tags in Finder Settings
With Finder active, open Finder > Settings from the menu bar at the top of the screen. The wording can vary slightly between macOS versions, but these three sections are a useful place to start.
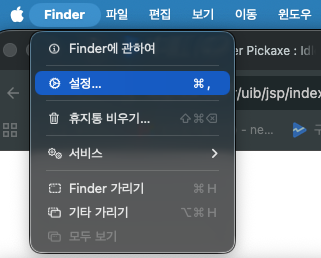
In General, choose what a new Finder window should show. If you would rather see Home, Documents, or Downloads than Recent items whenever Finder opens, choose the location you use most often here.
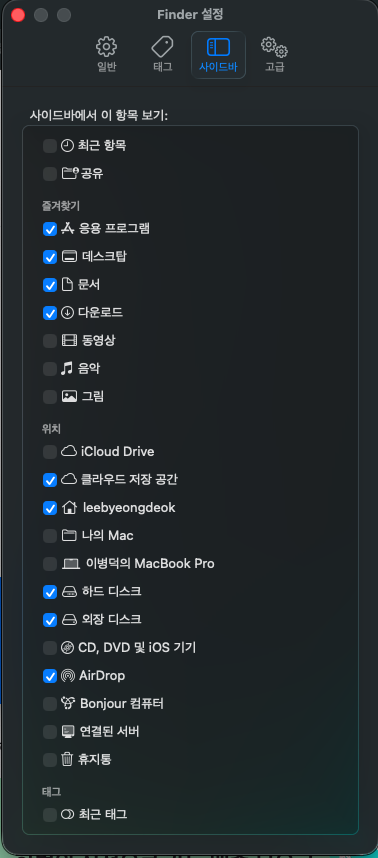
In Sidebar, choose what appears on the left side of Finder. Keeping only frequently used items such as Applications, Desktop, Documents, Downloads, Home, and the internal disk makes the list easier to scan. See Apple's official guidance for Finder sidebar settings for the available categories.
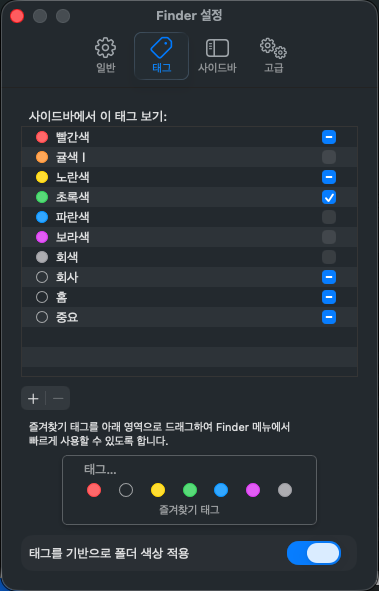
In Tags, choose the colored tags that can be assigned to files and folders and the tags that appear in the sidebar. Showing every color at once can make the list harder to use, so I recommend starting with one or two colors. A tag is not a replacement storage location; it is an additional way to group files that live in different folders.
Configure Desktop and Documents syncing in iCloud
If you want to use the Desktop and Documents folders on other Apple devices, open Apple menu > System Settings > [your name] > iCloud > Drive (iCloud Drive) > Sync this Mac > Desktop & Documents Folders. Depending on your macOS version, iCloud Drive may appear simply as Drive.
When this feature is enabled, the Desktop and Documents folders are stored in iCloud Drive and can be accessed from other devices signed in to the same Apple Account. If you delete a file on one device, however, it may also be deleted on the others. iCloud syncing should not be treated as the same thing as a backup.
This feature also uses iCloud storage. If storage is nearly full, or if multiple cloud services try to manage the Desktop and Documents folders at the same time, unexpected syncing problems can occur. For beginners, choosing one syncing method is usually safer. See Apple's guide to adding Desktop and Documents to iCloud Drive.
iCloud syncing is not a backup. Prepare a separate backup for important files, and check your iCloud storage and other cloud apps before enabling Desktop and Documents syncing.
Understand the Finder window and tabs
Use Column View to see a folder hierarchy
The upper-right area of a Finder window provides several ways to display files and folders. The main choices are Icon View, List View, Column View, and Gallery View. I keep Column View as my default when I need to understand a folder hierarchy.

In Column View, selecting a parent folder in the left column shows its contents in the next column to the right. Selecting a subfolder adds another column. This makes it easy to see both the folder that contains the current file and the folders above it at a glance.
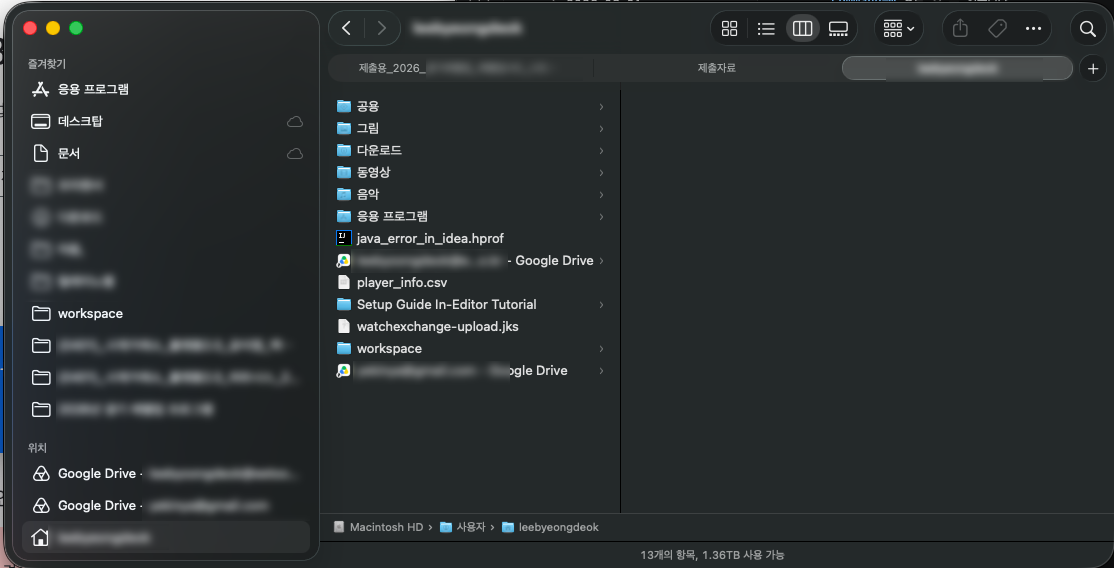
You can adjust the view for each folder with View > Show View Options or Command-J. You can change icon size, sorting, and which details are shown, but for this article it is enough to understand the differences between the four views and why Column View is useful. Apple's official guide to Finder views and view options has the full list.
Choose between new windows and new tabs
Finder's default behavior is to open a new window. Use Command-N to open a new Finder window when you are not opening a specific folder.
If you want folders and documents to open in tabs, go to System Settings > Desktop & Dock > Windows > Prefer tabs when opening documents > Always. With this option enabled, opening folders can create a new tab in the existing Finder window instead of adding another window.
Use the + button or Command-T to add a tab. Keeping several tabs in one window can be convenient when moving between areas such as Work, Personal, and Reference. If you want to turn one tab into a separate window, drag the tab out of the window. Apple's official guide to opening folders in tabs or windows explains the related options.
The main areas in the left sidebar
The left side of Finder contains shortcuts to locations you use often. It is easier to understand this list as a set of quick links to folders and devices rather than as the folders themselves.
Applications: the default location for installed apps. Removing an app icon from the Dock is not the same as uninstalling the app from Applications.Desktop: the location connected to files shown on the desktop. When Desktop and Documents syncing is enabled, it can be connected to the Desktop folder in iCloud Drive.Documents: a standard Documents folder created inside your home folder. It may be stored in iCloud Drive when syncing is enabled.Downloads: a common default location for files received from web browsers and file-sharing apps. An app such as Chrome can change its download location, so not every downloaded file must appear here.Home: the location containing your personal files and standard folders.Internal disk: the Mac's startup disk and the place to inspect the system's top-level locations.
You can drag a frequently used folder from a Finder window into the Favorites area of the sidebar to add a shortcut. The folder stays in its original location; only a quick-access link is added to the sidebar. To remove it later, drag the shortcut out of the sidebar.
The basics of folders, paths, and locations
A folder is both a layered basket and an address system
For a beginner, it is useful to think of a folder as a “layered basket” for managing files. Just as a large basket can contain smaller baskets, a folder can contain subfolders and files.
For example, you might create Documents, Photos, and Backup folders inside a Project folder and place the relevant files inside each one. A clear structure lets you find a file by remembering which basket contains it, rather than remembering only the file name.
A path is the address used to locate a file. Macintosh HD > Users > your account (Home) > Documents > Project describes a move from left to right into deeper folders. With the path bar enabled, you can confirm your current location and jump back to a parent folder. You can also Control-click a folder in the path bar to copy its path. See Apple's guide to file, folder, disk, and path information.
Macintosh HD, Users, and the Home folder
Macintosh HD under Finder's Internal disk is the name of the Mac's startup disk. It is helpful to connect this location with the root path / used in Terminal, while remembering that Finder and Terminal present the same storage hierarchy in different ways.
Inside it, the Users folder contains the home folders for people who use the Mac. Open Users > your account name to reach your home folder, which contains personal locations such as Desktop, Documents, Downloads, Photos, Music, and Movies.
Folders such as System and Library are used by macOS and apps. Renaming or moving them can prevent the operating system or apps from working correctly, so beginners should keep personal files inside their home folder. Apple's official documentation on standard Mac folders explains which folders should be left in place.
How files are actually stored
The folder tree is not merely a picture that Finder invents for human convenience. The macOS file system manages names, folders, permissions, and metadata in a directory structure, and connects file contents to areas of the storage device. The folder structure shown in Finder is therefore a real logical structure managed by the file system.
At the same time, the visible folder structure and the physical locations of file contents on a disk are not always a one-to-one match. File contents can be stored across multiple areas of a storage device while the operating system uses file-system information to present them as one file.
For beginners, it is enough to say that a folder is an address system that records file names and locations, while the actual file contents are stored on the device. You do not need to understand APFS data structures to use Finder.
AirDrop is a transfer screen, not a folder
AirDrop in the Finder sidebar is not a folder. It is a wireless transfer screen for discovering and sending files to nearby Apple devices such as Macs, iPhones, and iPads.
When another device appears in the AirDrop window, drag a file onto it and the recipient can choose whether to accept it. Received items may be saved to Downloads or another location depending on the file type and receiving action, so do not think of AirDrop itself as a place where files accumulate. See Apple's official AirDrop guide.
Wi-Fi and Bluetooth must be enabled, and distance and receiving permissions also affect whether a device appears. A later article will cover the actual steps for sending and receiving files with AirDrop.
Summary
There are four ideas to remember from this article:
- Finder is the Mac's file explorer, and its menu appears at the top of the screen rather than inside the window.
- Showing the
Toolbar,Path Bar, andStatus Barmakes it easier to work with files and check your current location and status. - Combining
Column View, tabs, and sidebar shortcuts lets you understand folder structures and move quickly to frequently used locations. - iCloud is a syncing feature and AirDrop is a transfer screen; neither one is an ordinary folder.
In the next article, we will look at file extensions, Quick Look, archive files, app removal, and the default location for screenshots—more everyday Finder tasks for Mac beginners.



No comments:
Post a Comment